4 ways to get creative with Music Photography

Music Photography has been my bread and butter for the past 8 years or so, and over this time I experimented with a lot of different styles and techniques, in order to get away from ending up with the same images over and over. So here are 4 of my favorite ones that I try to incorporate into my work as much as I can:

1. In-Camera Multiple Exposures

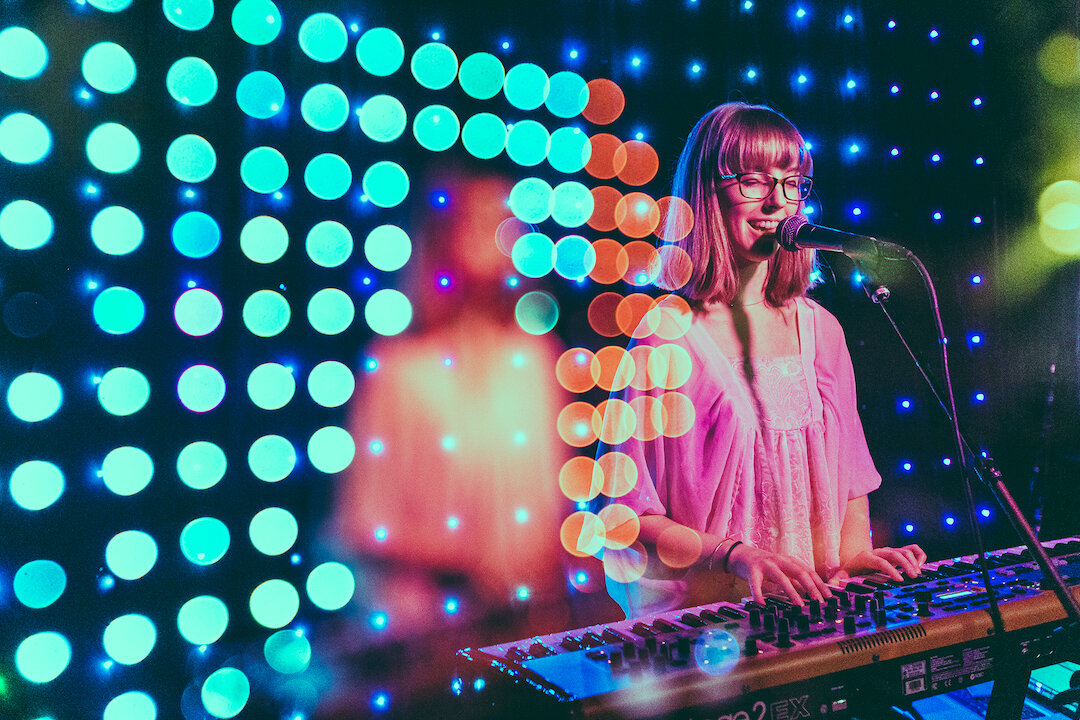
Obviously, there’s no other way to start this list without mentioning Multiple Exposures, a technique that I like to use pretty much in any type of Photography I do, and for which I became known. These images planned on the spot and created in-camera (read a tutorial here), making it for always intriguing and interesting images:

Jessica Meyer (live at BAM Café, NYC 2017)

Jessica Meyer (live at BAM Café, NYC 2017)

Rosemary Minkler (live at Bowery Electric, NYC 2018)

Rosemary Minkler (live at Bowery Electric, NYC 2018)

Choro das 3 (live at Sheen Center, NYC 2019)

Choro das 3 (live at Sheen Center, NYC 2019)


2. Slow Shutter

Music Photography is almost always associated with faster shutter speed to freeze the moment and create timeless images. But rules are meant to be broken and sometimes all you gotta do is be ready to think outside the box:

Keith Ward (live at Rockwood Music Hall

Keith Ward (live at Rockwood Music Hall

Backup Planet (live at Brooklyn Bowl, NYC 2017)

Backup Planet (live at Brooklyn Bowl, NYC 2017)


3. Narrow Aperture

And speaking of rules, another common one is to keep your aperture as wide as possible, since you’re (most of the time) photographing in low light situations and need as much light to get to your sensor. But hey, who said that you cant bump up your aperture once in a while?

Raye Zaragoza (lleve at Irving Plaza, NYC 2019)

Raye Zaragoza (lleve at Irving Plaza, NYC 2019)

Mars Motel (live at Knitting Factory, NYC 2017)

Mars Motel (live at Knitting Factory, NYC 2017)


4. Using a Prism Filter

More recently I began to experiment with using prisms in front of my lens, and the results are so incredible (when shooting a visually interesting artist and background) that it becomes almost impossible not to use it all the time. These were taken with Fractal Filters.

LGBAC Symphonic Band (live at Symphony Space, NYC 219)

LGBAC Symphonic Band (live at Symphony Space, NYC 219)

Emily King (live at Central Park SummerStage, NYC 2019)

Emily King (live at Central Park SummerStage, NYC 2019)

Corinne Bailey Rae (live at Central Park SummerStage, NYC 2019)

Corinne Bailey Rae (live at Central Park SummerStage, NYC 2019)

Before & After: Williamsburg Bridge

This is not going to be a post about why every Photographer should be always shooting in RAW mode, but to talk about a specific tool inside Lightroom instead: the Transform tool - which in my opinion, is one of the most powerful ones.

As an Architecture enthusiastic, I'm a huge fan of ultra-wide lenses, giving me the opportunity to fit much more of the subject in the frame without having to move that farther out. But one of the disadvantages of using a wide-lens is that, the closer you get to your subject, the more distorted it will look in the frame, especially on the perimeters. Unless you are using a tilt-shift lens (like a 24mm or a 17mm), of course, which wasn't my case.

When revisiting some photos I took of the Williamsburg Bridge (NYC) back in 2017, I came across this classic view under the bridge, from Manhattan looking towards Brooklyn. Before getting into any color correction and lighting adjustments, I focused on correcting the perspective of the bridge, wanting to achieve a more realistic look as opposed to all the distortion caused by the lens. On using the "Transform" panel (normally the third from the bottom), all I had to do in this case was to select the "guided" option and, using 2 lines to guide me, trace them in parallel to each side of the bridge. And just like magic, Lightroom brings back the original perspective that you'd see by standing at the location from where this picture was taken. From there, I manually adjusted the "Aspect" and "Scale" little by little until I got the results I was looking for.

Williamsburg Bridge, NYC | © Leonardo Mascaro

To finish up, I went through all the usual basic adjustments I normally do for all my work, to achieve the lighting and colors of my signature style. Here's a before and after of the process:

Williamsburg Bridge, NYC | © Leonardo Mascaro


📸 • Equipment used to take this photograph: Canon 6D + Canon 16/35mm 2.8

🎙 • Soundtrack while writing this post: Partir, by Nuven

The DO’s and DON’Ts about being a Photographer’s Assistant, and why everybody should do it at least once!

Years ago, before Photography became something that anybody and everybody could do, mostly due to the advance of technology and social media, being an Assistant was one of the few ways to start a career in Photography. Being side by side with a working Photographer would give you not only the chance of learning the skills but also to navigate through different situations, from communicating with clients to set-up and break down equipment, to everything post-production related. It was also a way to establish relationships that could lead you to your first jobs down the road.

When I started my career in Photography, about a decade ago, being an Assistant wasn’t something that everybody wanted to do, unless you were specifically looking to get your feet through the door on working in a studio shooting more commercial jobs. In my case, I was coming from a Graphic Design and Video background, so my first experiences as an assistant came from assisting DPs on small film sets, mainly keeping an eye on the gear and helping the cinematographer changing lenses, setting up lighting, backup footage from memory cards, etc. From the start, one of my favorite things about doing that was simply being present and ready to help in any way that was within my expertise (or sometimes not). From there, I assisted a couple of different Wedding Photographers and a couple of studio portrait sessions. But after that, I ended up moving forward with my own shoots, back then almost exclusive in the Music Photography spectrum.

NYC | © Leonardo Mascaro • Equipment used: Fujifilm X-T2 + Fujinon XF16-55mmF2.8 R LM WR

NYC | © Leonardo Mascaro • Equipment used: Fujifilm X-T2 + Fujinon XF16-55mmF2.8 R LM WR

Until about 6 years ago, already living in NYC, when I started to help out assisting other Photographers, more towards studio/portraits/commercial shoots. In parallel to spending most of my time shooting Music, I then started to slowly explore the world of Architectural Photography and, once I realized I was truly interested in the subject, the natural path was to connect with more stabilized Photographers in the field and go back to assisting, which I’ve been doing for the past 3 years or so. But to my surprise, the more I did that, the more I realized how much I enjoyed being the assistant and wasn’t necessarily rushing to get my own clients.

→ So here are 6 reasons why every Photographer should consider being an Assistant:

  1. You will slowly learn the skills and specifics for that type of Photography;

  2. Even if you already consider yourself good, you will still end up learning a lot, since us Photographers tend to do things differently from one another;

  3. More importantly, you will learn how to navigate through different situations during the Photoshoot;

  4. It’s an opportunity to step back, be helpful and absorb as much as you can about everything that’s happening around you;

  5. It’s one of the best ways to create a good impression and connect with other people in that field you are interested in;

  6. At the end of the day, you get to go home and don’t have to worry about post-production, communicating with the client, etc, unless you are also responsible for that, of course, which is not always the case.


→ The DO’s when assisting on any type of shoot:

  • Always be humble and prompt to help;

  • Don’t go out of your way trying to give suggestions or teach anything to the Photographer, unless you feel you are welcome or (even better) if you’re being asked to do so;

  • Have a “problem-solving” frame of mind;

  • Act like the Photographer’s second pair of eyes and make sure everything is running smoothly;

  • Stay positive and enjoy the experience!

→ The DON’Ts when assisting on any type of shoot:

  • Don’t use your cellphone during the shoot! Unless (obviously) you are asked to make a phone call, check something online, etc. Otherwise, don’t keep checking your notifications every 5 seconds, seriously.

  • Don’t engage in conversations with the client, unless they are directed to you. Remember that they are the Photographer’s client, not yours.

  • Never (I said NEVER) use the opportunity to network, thinking you’ll get jobs out of it. If the opportunity is ever there, the Photographer (you are assisting) will remember and refer you, considering you do a great job, of course.

  • Bonus Tip: if you have a bag with you, even something small like a fanny pack, keep your keys, wallet, and cellphone there at all times, you’ll be way less distracted and tempted to check all the time.


→ Here is a list of things that may be helpful to have with you in most situations when assisting, because every assistant should carry a few useful tools and save the day:

  • Lens Pocket: this is especially handy if you are working outdoors, moving around quickly, and assisting a Photographer that needs to constantly change in between a couple of lenses. This way you won't have to reach inside the camera back all the time. Just make sure you get the one that will fit the lens(es) you will need to carry, of course;

  • Gaffers Tape: This is a super strong and versatile tape that is easy to use and to remove it (depending on the surface). You've probably seen it and didn't know the name;

  • Multi-Plier: A multi-tool that folds nicely and you can carry all-around with you. You may not use it all the time, but you'll be thankful to have one when the day comes;

  • Sharpies: Always good to have a couple (or more) around, to be able to mark and label diverse things;

  • Utility Knife: Another one that you may not use all the time, but can come useful on occasion;

  • iPhone Charger: who doesn't want to be the popular person on the set always ready to save the day when someone needs to charge their phone?

  • Multi-Card Reader: this can be handy especially if you're working on a set where pictures will be downloaded on the go;

  • Lens Care Kit: extremely useful to have in your kit and be able to quickly clean a lens or a screen;

  • Hex Key Set: as the multi-tool, you may not use this one all the time, but it's nice to have with you;

  • A small bag: and in case you don't want to bring all of this loose inside a backpack, you can use a smaller bag like this, or even smaller, depending on the kit you are planning to carry around. You can get creative here, based on your style and size you need.